When you’re working on a new area of a project, adding new features, writing new code, or even refactoring and reorganising existing code, you often need to create a lot of new files. The most common way to do so is through the File > New > File… menu in Xcode. Depending on the type of file, you may end up with a more or less elaborate template, with some boilerplate code to help you get started. This can be useful when getting to know the Apple frameworks, or later to save some time writing boring code. Wouldn’t it be nice to further customise these templates? To have templates specifically tailored to your own style, projects or tastes? Let’s see how to create your own file template with Xcode 9.
Before we start talking about how to customise entire file templates, let’s have a quick look at the file headers. Ole Begemann has a thorough article on this topic. Apple introduced a new text macro in Xcode 9 that all default templates use: FILEHEADER. Ole’s article goes in detail about the little quirks and limitiations of this macro. It allows you to customise the file header of any templated file, yours as well as the default Apple ones.
I don’t think there’s any official documentation to support the Xcode templating system, so what’s presented here is from my tinkering with Xcode 9 (beta 6), so take it with a grain of salt.
Table of Contents
Anatomy of a File Template
At the file system level, an Xcode File Template is just a folder with a few conventions. User-defined templates should be located in:
~/Library/Developer/Xcode/Templates/File Templates/<Custom Group Name>
You can have any number of groups, for this article let’s go with My Custom Templates. Within this folder you can create any number of templates. So let’s imagine we start with a new folder called Basic Template.xctemplate, that’s our first Xcode File Template.
At the very minimum you’ll need the following:
📂 Basic Template.xctemplate
  📄 ___FILEBASENAME___.swift
  📄 TemplateInfo.plist
Or if you’re working with Obj-C:
📂 Basic Template.xctemplate
  📄 ___FILEBASENAME___.h
  📄 ___FILEBASENAME___.m
  📄 TemplateInfo.plist
For this example, let’s use an extremely basic source file (we’ll see more options to customise later):
//  ___FILEHEADER___

import Foundation

class ___FILEBASENAME___ {

}
The PList file has to have at the very minimum the Kind key (of string type), which can take 2 values. The most used one is Xcode.IDEKit.TextSubstitutionFileTemplateKind. Another possible value seems dedicated to templates that generate NSManagedObject classes for Core Data Xcode.IDECoreDataModeler.ManagedObjectTemplateKind. I haven’t tried it yet, so I wouldn’t be able to advise how to use it.
The minimal PList file looks like this:
<?xml version="1.0" encoding="UTF-8"?>
<!DOCTYPE plist PUBLIC "-//Apple//DTD PLIST 1.0//EN" "http://www.apple.com/DTDs/PropertyList-1.0.dtd">
<plist version="1.0">
<dict>
  <key>Kind</key>
  <string>Xcode.IDEKit.TextSubstitutionFileTemplateKind</string>
</dict>
</plist>
Now you should be able to see something like the following screenshot in Xcode:
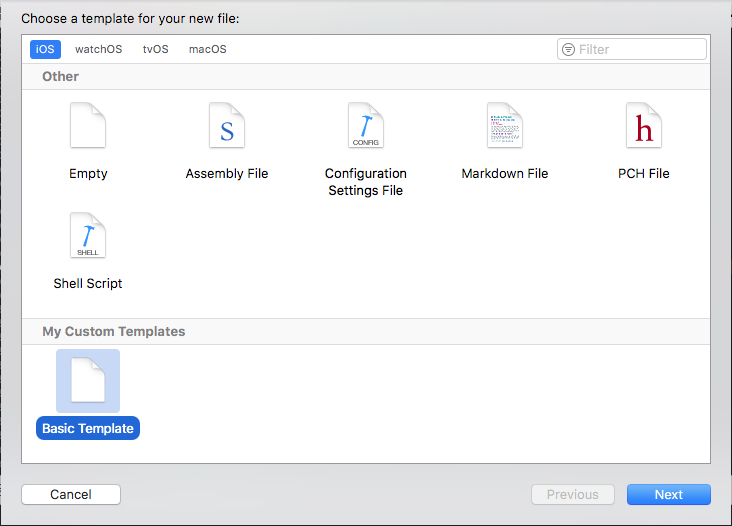
A Description and a Summary key were used in prior versions of Xcode to display a tooltip and a description. It looks like because of UI changes in more recent versions, Xcode doesn’t use those keys anymore.
Other simple useful keys are:
DefaultCompletionName(string type): used to prepopulate the file name field in the “Save As” dialog.AllowedTypes(array of string type): used to restrict which type of files can be saved, it is only losely enforced. Values are strings of Uniform Type Identifiers. The most common ones for source files would be:public.swift-sourcepublic.c-headerpublic.c-sourcepublic.c-plus-plus-sourcepublic.objective-c-sourcepublic.objective-c-plus-plus-source
Platforms(array of string type): used to restrict the template to certain platforms, which effectively only seems to change under which tab the template will be shown in the wizard. Values can be:com.apple.platform.macosxcom.apple.platform.iphoneoscom.apple.platform.watchoscom.apple.platform.appletvos
Let’s amend our basic template so our PList looks like the following:
<?xml version="1.0" encoding="UTF-8"?>
<!DOCTYPE plist PUBLIC "-//Apple//DTD PLIST 1.0//EN" "http://www.apple.com/DTDs/PropertyList-1.0.dtd">
<plist version="1.0">
<dict>
<key>Kind</key>
<string>Xcode.IDEKit.TextSubstitutionFileTemplateKind</string>
<key>DefaultCompletionName</key>
<string>Basic</string>
<key>AllowedTypes</key>
<array>
<string>public.swift-source</string>
</array>
<key>Platforms</key>
<array>
<string>com.apple.platform.iphoneos</string>
</array>
</dict>
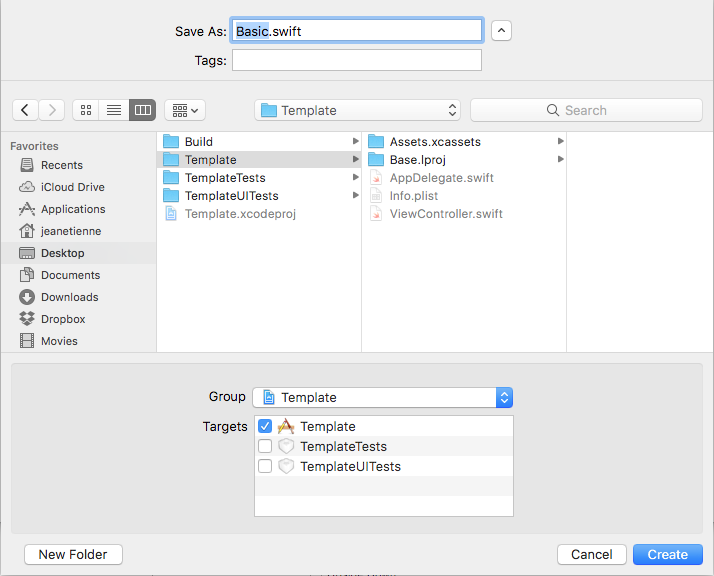
</plist>Now you will only see your basic template under the iOS tab of the file template wizard, and when saving the file, the dialog will prepopulate the file name to Basic.swift. If you hit “Create”, Xcode will create a copy of the ___FILEBASENAME___.swift and obviously replace all instances of the FILEBASENAME macro with whatever you have entered in the dialog.
What happens if you want your file name to be slightly different from your class name? You may want to have spaces or other characteres replaced by hyphens or underscores. For that pupose, you can use a different macro, or a modifier of a macro, for more information on this topic, I recommend you read the Xcode Text macro reference, and the Xcode Text macro format reference.
In our specific example, the most reasonable choice is to use the FILEBASENAMEASIDENTIFIER macro like so:
//  ___FILEHEADER___

import Foundation

class ___FILEBASENAMEASIDENTIFIER___ {

}
This will replace any non standard C character with an underscore.
This template could come in handy if you had to generate a lot of similar looking classes. But we’re still at the Copy/Paste level of usefulness. Let’s see what we can do to make it a bit more dynamic.
Advanced File Template
In the previous example we saw how to create a basic File Template to generate a single custom file. Nothing prevents you from generating several files in one go, your template could contain the following structure (it may not make sense for a real-life project, this is just for the sake of example):
📂 Basic Template.xctemplate
  📄 ___FILEBASENAME___-Header.h
  📄 ___FILEBASENAME___.swift
  📄 ___FILEBASENAME___View.swift
  📄 ___FILEBASENAME___Model.swift
  📄 ___FILEBASENAME___ViewModel.swift
  📄 ___FILEBASENAME___.xib
  📄 TemplateInfo.plist
And when saving with a file name of “ListModule” for instance, it would generate the following files:
ListModule-Header.h
ListModule.swift
ListModuleView.swift
ListModuleModel.swift
ListModuleViewModel.swift
ListModule.xib
Of course you can customise each file with whatever source makes sense in your context, but you’d still go through a Save dialog like this one:
Which makes you feel like you’re creating a single file… So let’s see how we can display a “configuration panel” with text fields, drop down menus and checkboxes, much like the default “Cocoa Touch Class” template that lets you choose a few options before generating one or several files.
For this example, let’s pretend we want a template to create a View, a Model and a ViewModel for an iOS app. We also want to give the opportunity to let the user choose if the view is coming from the Main storyboard, from a XIB file or from code, so the loading code can be generated adequately.
Let’s start with a few simple files for now in this new template:
📂 View, Model & ViewModel.xctemplate
  📄 ___FILEBASENAME___.swift
  📄 ___FILEBASENAME___View.swift
  📄 ___FILEBASENAME___ViewModel.swift
  📄 TemplateInfo.plist
So far the View, Model and ViewModel files are pretty barren, we’ll come back to those later:
___FILEBASENAME___.swift:
//  ___FILEHEADER___

import Foundation

class ___FILEBASENAMEASIDENTIFIER___ {

}___FILEBASENAME___View.swift:
//  ___FILEHEADER___

import UIKit

class ___FILEBASENAMEASIDENTIFIER___: UIView {

}___FILEBASENAME___ViewModel.swift:
//  ___FILEHEADER___

import Foundation

class ___FILEBASENAMEASIDENTIFIER___ {

}
The PList will be a bit different from the PList of the basic template:
- We won’t need the
DefaultCompletionNameandAllowedTypeskeys, as we’re not offering the option to chose a single file name anymore. - We’re introducing an
Optionskey, which is an array of dictionaries. Each dictionary represents an option.
An “option dictionary” has the following keys:
| Key | Description | Type |
|---|---|---|
Name |
Label displayed next to the option. | String |
Description |
Description used as a tooltip when the mouse hovers over the option. | String |
Type |
The type of the option, possible values are: checkbox, text, static, combo, popup. |
String |
Required |
Whether the wizard should disable the Next button if this option doesn’t have a value. | Bool |
Identifier |
Uniquely identifies the option and is used to refer to the option’s content as a variable. | String |
Default |
Default value, can use variables from other options (using the strings true or false, or using the Bool values <true/> or <false/> doesn’t seem to work with checkbox types, as the wizard seems to remember the last used value). |
String |
Values |
The possible values of a combo or popup. |
Array of String |
RequiredOptions |
Can be used to enable the current option, only if certain values of another option are selected. For example, only enabling a checkbox for some values of another popup option. The key of the dictionary must be the identifier of the other option, and the value of the dictionary must be the array of subset of values from the popup or combo option that allow the current option to be enabled. |
Dictionary |
SortOrder |
Can be used to change the order in which the options are displayed, otherwise they are displayed in the order they are entered in the Options array. |
Number |
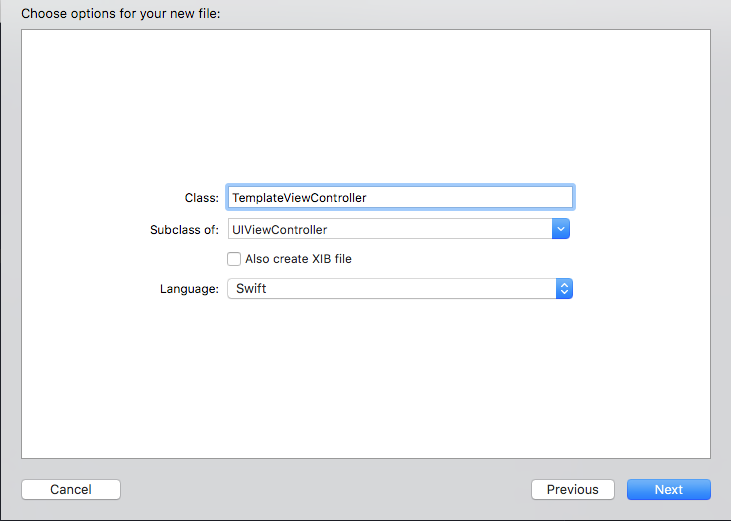
As long as there’s one option under the Options key, Xode will show a panel titled “Choose options for your new file”.
Adding Options
Let’s add a name for the View/ViewModel. To do so we need to add the following option to the Options key, like so:
<key>Options</key>
<array>
  <dict>
    <key>Identifier</key>
    <string>productName</string>
    <key>Required</key>
    <true/>
    <key>Name</key>
    <string>View:</string>
    <key>Description</key>
    <string>The name of the View and ViewModel to create</string>
    <key>Type</key>
    <string>text</string>
    <key>Default</key>
    <string>MyView</string>
  </dict>
</array>
⚠️ IMPORTANT: Note the identifier of the option: For Xcode to know that it is the base name you want to use for the files (and to populate the FILEBASENAME and FILEBASENAMEASIDENTIFIER macro), you need to stick to productName.
The full PList may look like this now:
<?xml version="1.0" encoding="UTF-8"?>
<!DOCTYPE plist PUBLIC "-//Apple//DTD PLIST 1.0//EN" "http://www.apple.com/DTDs/PropertyList-1.0.dtd">
<plist version="1.0">
<dict>
  <key>Kind</key>
  <string>Xcode.IDEKit.TextSubstitutionFileTemplateKind</string>
  <key>Platforms</key>
  <array>
    <string>com.apple.platform.iphoneos</string>
  </array>
  <key>Options</key>
  <array>
    <dict>
      <key>Identifier</key>
      <string>productName</string>
      <key>Required</key>
      <true/>
      <key>Name</key>
      <string>View:</string>
      <key>Description</key>
      <string>The name of the View and ViewModel to create</string>
      <key>Type</key>
      <string>text</string>
      <key>Default</key>
      <string>MyView</string>
    </dict>
  </array>
</dict>
</plist>
With this you should see the following screen in Xcode when you select your template:
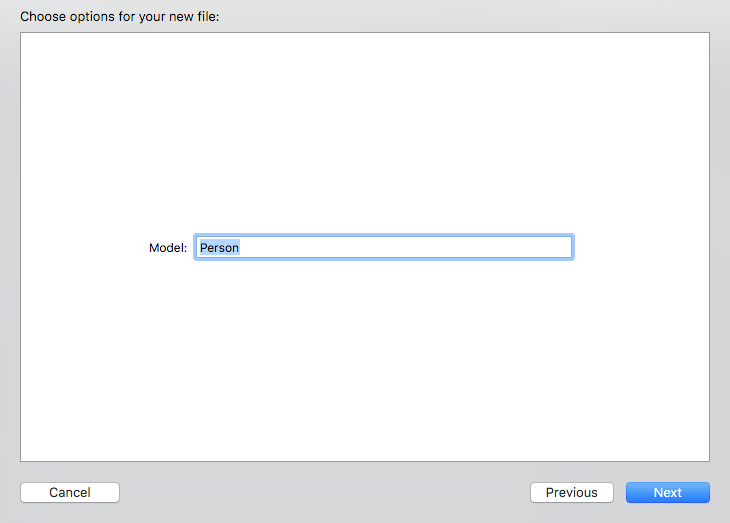
Note: The description appears if you hover over the label 😉.
Now if you click next, you will see a save dialog, asking you to chose a location, but you won’t be asked for a file name. The name is derived from the productName option.
Now let’s amend a bit the source files to make them a bit more useful and let’s start with the ___FILEBASENAME___ViewModel.swift (again, this is for the sake of example, you may implement your ViewModels differently):
//  ___FILEHEADER___

import Foundation

class ___FILEBASENAMEASIDENTIFIER___ {

  private let model: ___VARIABLE_productName:identifier___

  init(with___VARIABLE_productName:identifier___ aModel: ___VARIABLE_productName:identifier___) {
      model = aModel

      // Add you own ViewModel logic for a ___VARIABLE_productName:identifier___.
      // ...
  }

}
When using the template, if the user types “Person” in the name field for instance, the files will be generated with the names: Person.swift, PersonView.swift and PersonViewModel.swift, as expected.
However, in a rather confusing but also smart move, Xcode seems to be re-evaluating the FILEBASENAME macro (and FILEBASENAMEASIDENTIFIER) in context. Inside the file, the FILEBASENAME macro has the value “PersonViewModel”, which is the actual final name of the file, and is pretty useful for nameing the class. If you want to have the raw input of what the user typed, the word “Person”, you need to use the value of the productName variable.
Variables are based on the identifier of the “option” defined in the PList. For an option with identifier optionName you can access its value with ___VARIABLE_optionName___. You can also add colon separated modifiers to this macro, all of this is explained in the Xcode Text macro format reference.
In our case we want a C identifier from the variable named productName, so we use ___VARIABLE_productName:identifier___. Yep, it’s a bit wild 😱.
Note: I can’t find a macro modifier to change the case of a variable, and I don’t want to have a class member start with an uppercase character, that’s why in this case I gave it a generic sounding name model. you could add another option to your template, to ask the user to give you a name for this variable 🤷♀️.
In the same vein, we can amend the view with a function:
class ___FILEBASENAMEASIDENTIFIER___: UIView {

  func configure(withViewModel viewModel: ___VARIABLE_productName:identifier___ViewModel) {
    // configure the view with a ___VARIABLE_productName:identifier___ViewModel
  }

}
Code Variants
Now let’s add two options to ask the user of the template what type of View they want to use, and if they want to have a XIB file generated for them.
We’ll first add a popup with the following choices:
- Storyboard
- XIB file
- Code
This is done with the following option:
<dict>
  <key>Identifier</key>
  <string>viewType</string>
  <key>Required</key>
  <true/>
  <key>Name</key>
  <string>View type:</string>
  <key>Description</key>
  <string>The type of view to use</string>
  <key>Type</key>
  <string>popup</string>
  <key>Default</key>
  <string>Storyboard</string>
  <key>Values</key>
  <array>
    <string>Storyboard</string>
    <string>XIB file</string>
    <string>Code</string>
  </array>
</dict>
Now we’ll add a checkbox to offer to generate a XIB file. But this checkbox should only be active if the XIB file option is selected in the popup menu.
This is done with the following option:
<dict>
  <key>Identifier</key>
  <string>generateXIBfile</string>
  <key>Name</key>
  <string>Also create a XIB file</string>
  <key>Description</key>
  <string>Whether to create a XIB file with the same name</string>
  <key>Type</key>
  <string>checkbox</string>
  <key>RequiredOptions</key>
  <dict>
    <key>viewType</key>
    <array>
      <string>XIB file</string>
    </array>
  </dict>
</dict>
So now your PList should look like this:
<?xml version="1.0" encoding="UTF-8"?>
<!DOCTYPE plist PUBLIC "-//Apple//DTD PLIST 1.0//EN" "http://www.apple.com/DTDs/PropertyList-1.0.dtd">
<plist version="1.0">
<dict>
<key>Kind</key>
<string>Xcode.IDEKit.TextSubstitutionFileTemplateKind</string>
<key>Platforms</key>
<array>
<string>com.apple.platform.iphoneos</string>
</array>
<key>Options</key>
<array>
<dict>
<key>Identifier</key>
<string>productName</string>
<key>Required</key>
<true/>
<key>Name</key>
<string>View:</string>
<key>Description</key>
<string>The name of the View and ViewModel to create</string>
<key>Type</key>
<string>text</string>
<key>Default</key>
<string>MyView</string>
</dict>
<dict>
<key>Identifier</key>
<string>viewType</string>
<key>Required</key>
<true/>
<key>Name</key>
<string>View type:</string>
<key>Description</key>
<string>The type of view to use</string>
<key>Type</key>
<string>popup</string>
<key>Default</key>
<string>Storyboard</string>
<key>Values</key>
<array>
<string>Storyboard</string>
<string>XIB file</string>
<string>Code</string>
</array>
</dict>
<dict>
<key>Identifier</key>
<string>generateXIBfile</string>
<key>Name</key>
<string>Also create a XIB file</string>
<key>Description</key>
<string>Whether to create a XIB file with the same name</string>
<key>Type</key>
<string>checkbox</string>
<key>RequiredOptions</key>
<dict>
<key>viewType</key>
<array>
<string>XIB file</string>
</array>
</dict>
</dict>
</array>
</dict>
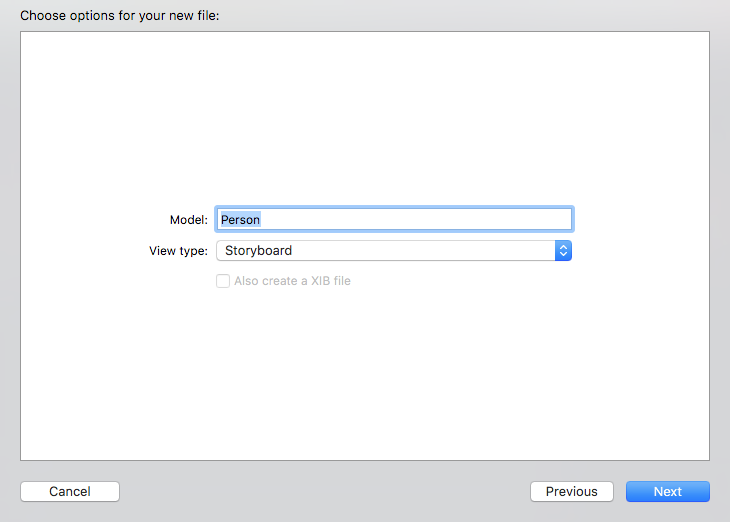
</plist>And your template options panel should look like this:
For this to actually work we need to go back to the files, and reorganise them. We need a subfolder for each variation in the .xctemplate folder. The subfolders need to follow a certain naming convention. For a popup (and I assume it works similarly for a combo, but I haven’t tested), the subfolders need to match the name of the possible values of the popup, for a checkbox, it just needs to match the identifier of the checkbox. If you want to combine values, you just append them in the order they are presented to the user.
This works out to be the following folder structure for our template:
📂 View, Model & ViewModel.xctemplate
  📁 Code
    // Files relevant for a view setup in code
  📁 Storyboard
    // Files relevant for a storyboard view
  📁 XIB file
    // Files relevant for a XIB file based view, without a XIB file
  📁 XIB filegenerateXIBfile
    // Files relevant for a XIB file based view, with a XIB file
  📄 TemplateInfo.plist
I know, the folder XIB filegenerateXIBfile has a pretty ugly name 😨
With all those folders, you can have as many variations of the code, but not all files need to change. In this example, only our ___FILEBASENAME__View.swift needs to change, and a XIB file needs to exist or not. The other two swift files don’t need to change. So to avoid duplicating to much code, I prefer having a “base folder” with the invariant files and hard-linking them into each template folder. Xcode only looks at the folder with names that match the options names, so a base folder would be invisible and wouldn’t impact the template.
To create a hard link, simply navigate in your terminal to the base folder, and use the following command:
ln model.swift ___FILEBASENAME__.swift
⚠️ IMPORTANT: Once you have created a hard link to a base file, you can’t copy/paste the same hardlinked file in other folders. You need to keep recreating “fresh” hard links.
Repeat the same steps for the ViewModel file, then simply paste a regular copy of the ___FILEBASENAME__View.swift in each template subfolder. You can also create a basic XIB file in Xcode and include it in the ugly named folder XIB filegenerateXIBfile. In the XIB file you may want to edit the XML to add a FILEBASENAMEASIDENTIFIER macro to help link it to its base class.
Once you’ve done all of this, you should end up with the following folder structure:
📂 View, Model & ViewModel.xctemplate
  📂 base
    📄 model.swift
    📄 viewModel.swift
  📂 Code
    📄 ___FILEBASENAME___.swift → model.swift
    📄 ___FILEBASENAME___View.swift
    📄 ___FILEBASENAME___ViewModel.swift → viewModel.swift
  📂 Storyboard
    📄 ___FILEBASENAME___.swift → model.swift
    📄 ___FILEBASENAME___View.swift
    📄 ___FILEBASENAME___ViewModel.swift → viewModel.swift
  📂 XIB file
    📄 ___FILEBASENAME___.swift → model.swift
    📄 ___FILEBASENAME___View.swift
    📄 ___FILEBASENAME___ViewModel.swift → viewModel.swift
  📂 XIB filegenerateXIBfile
    📄 ___FILEBASENAME___.swift → model.swift
    📄 ___FILEBASENAME___View.swift
    📄 ___FILEBASENAME___View.xib
    📄 ___FILEBASENAME___ViewModel.swift → viewModel.swift
  📄 TemplateInfo.plist
The customisation if the View files (different init for different ways of loading the view, depending on the type of view) and the XIB file is left as an exercise for the reader 😁.
You can find the source for this template on GitHub 🐙.
You now have a pretty advanced Xcode template that can generate several files with several variations of your own custom boilerplate. It even lets you choose if you want to generate a XIB file or not. That’s pretty neat!
Finishing Touch
The last finishing touch to have a professional looking template is of course to add an icon! Xcode will recognise the following files for your template icon:
- TemplateIcon.png (48 ⨯ 48)
- TemplateIcon@2x.png (96 ⨯ 96)
They need to be placed directly in the template folder, along with the PList.
Sources
When I first got interested in Xcode Templates I read a few blog articles, most of them were quite dated (from Xcode 4 or around). The best source for up to date information is to have a look at Xcode’s default templates located in:
Xcode.app/Contents/Developer/Library/Xcode/Templates
or
Xcode.app/Contents/Developer/Platforms/<platform>/Developer/Library/Xcode/Templates/
An invaluable reference is Steffen Itterheim’s “Xcode 4 Template Documentation”. Steffen made this book free a few years ago, so you have no reason not to grab it. It’s obviously a bit outdated, but is still very helpful.
Comments
Feel free to comment on Hacker News or reach out on Twitter 🐦